
Walls
Designers looking to specify any wall to meet or exceed NCC/BCA energy efficiency for buildings of any
height.
Selecting the correct insulation type and thickness needs to be carried out in conjunction with the thermal
assessment either using the deem to satisfy or JV3 modeling.
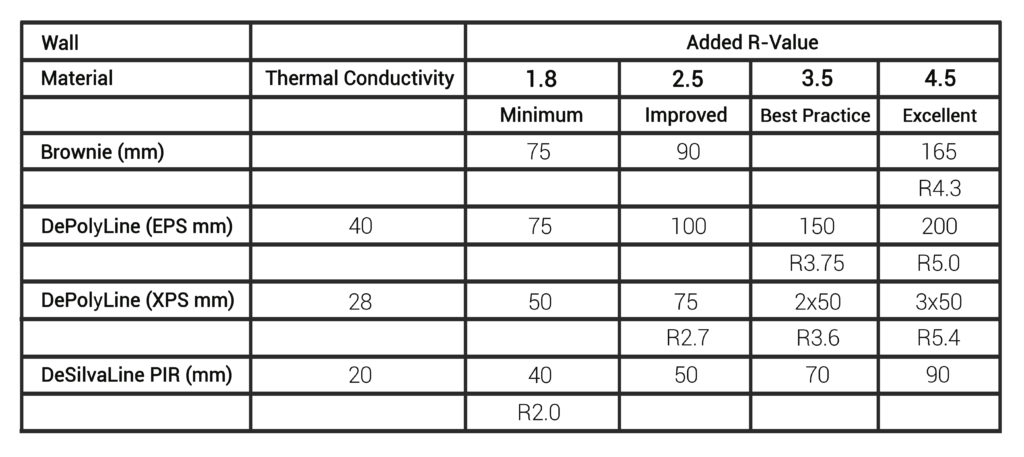
We provide a guide to insulation types and thicknesses to allow the designer to control the space required
and the position to meet requirements such as condensation, waterproofing, thermal bridging,
airtightness, fire and acoustic performance. Final approval must be sort by the authority having
jurisdiction using test and engineering documentation provided by the manufacturer.
WARNING: Before selecting a product consult the fire engineer or certifier to specify the wall requires to
meet FRL conditions on the boundary. Non-combustible walls can be specified by using Brownie
Glasswool. Using De Silva Solutions and Integra Building Products a balanced solution can be developed
to meet your desired outcome.
Framed wall thermal break and airtight layer
Product: DeSilvaLine by Pirmax [20/25]mm
Description: DeSilvaLine PIR is a modified polyurethane (PIR-polyisocyanurate) rigid foam board with
reflective pure foil facer either side of the PIR core. The product is suitable for use as thermal insulation
in framed ceiling and/or wall systems*.
Application: To steel framing with lightweight external cladding.
R-Value: ≥ 1.0.
Screw fixing : Button head screws at 1 m centres.
Adhesive fixing : Wallboard adhesive walnuts at 1 m centres.
* Check if wall system needs to be non-combustible.
Framed walls – bulk insulation
Product: Brownie by Ecowool
Description: Brownie Glasswool the formaldehyde free range of ECOWOOL-Brownie glass mineral
wool insulation manufactured by PGF Insulation employs formaldehyde free binder that is free of
formaldehyde, phenol or any other artificial chemicals.
Installation: Friction fit between framing members. If other support is not provided, staple nylon twine
to the framing and stretch tight.
Masonry veneer cavity walls
Product: DeSilvaLine by Pirmax
Description: DeSilvaLine PIR is a modified polyurethane (PIR-polyisocyanurate) rigid foam board with
reflective pure foil facer either side of the PIR core. The product is suitable for use as thermal insulation
below roof membrane systems.
Application: To steel or timber framing.
Installation: Horizontally with the tongue to the top edge, pushed over prefixed wall ties and held firmly
against the wall frame. Keep boards clean and dry and free from mortar and grout. Do not bridge the
cavity.
Fixing: Hex head screws at 450 mm centres.
Flashings: Install flashings before installing insulation panels. Prevent entry of water behind the
insulation boards.
Masonry veneer cavity walls – pliable building membrane
Product: Fastwrap Wall vapour permeable pliable building membrane.
Description: Fastwrap is a synthetic building underlay for use under claddings. The underlay consists of
two UV stabilised spun-bonded polyproppylene layers and a UV stabilised film layer.
Application: Provide a vapour permeable membrane behind external facing material which may be
subject to condensation forming on the internal face.
Installation: Run the vapour permeable pliable building membrane horizontally on the outer face of
external wall framing, over the flashing, from the bottom plate up. Pull taut (not tight) over the framing
and fix to framing members. Seal across the wall cavity at the top.
Horizontal laps: At least 150 mm wide, lapped to make sure water is shed to the outer face of the
membrane. End or vertical overlaps laps: At least 150 mm wide made over framing.
Openings: Run the vapour permeable pliable building membrane over the openings and leave covered
until windows and doors are installed. Cut the membrane on a 45° diagonal from each corner of the
opening, fold the flaps inside and fix to the inside frame of the opening. If the membrane is used to
provide a continuous air tight layer, seal all joints with pressure sensitive adhesive tape compatible with
the vapour permeable material.
Fixing: Install fasteners spaced at 300 mm intervals as follows, unless prevailing or expected wind
conditions require additional fasteners to adequately secure the product prior to cladding:
- Timber frames: Metallic-coated clouts, 20 mm long 6 to 8 mm staples or punched multi-point metallic-coated steel brads.
- Steel or aluminium frames: Hex head screws, with either 20 mm diameter washers or through hardboard strips.
- Plywood Alternatives: Metallic-coated clouts, 20 mm long 6 to 8 mm staples or punched multi-point metallic-coated steel brads at minimum 300 mm centres.
Product: Reflective foil vapour barrier pliable building membrane (Climate zone 1-3)
Application: Provide a thermal contribution to the building system and restrict the flow of water vapour into the building when the internal environment is air conditioned.
Installation: Run the membrane horizontally on the outer face of external wall framing, over the flashing, from the bottom plate up. Pull taut (not tight) over the framing and fix to framing members. Seal across the wall cavity at the top.
Horizontal laps: At least 150 mm wide, lapped to make sure water is shed to the outer face of the membrane. End or vertical overlaps laps: At least 150 mm wide made over framing.
Openings: Run the membrane over the openings and leave covered until windows and doors are installed. Cut the membrane on a 45° diagonal from each corner of the opening, fold the flaps inside and fix to the inside frame of the opening. If the membrane is used to provide a continuous air tight layer, seal all joints with pressure sensitive adhesive tape compatible with the material.
Fixing: Install fasteners spaced at 300 mm intervals as follows, unless prevailing or expected wind conditions require additional fasteners to adequately secure the product prior to cladding:
- Timber frames: Timber frames: Metallic-coated clouts, 20 mm long 6 to 8 mm staples or punched multi-point metallic-coated steel brads.
- Steel or aluminium frames: Hex head screws, with either 20 mm diameter washers or through hardboard strips.
- Plywood Alternatives: Plywood Alternatives: Metallic-coated clouts, 20 mm long 6 to 8 mm staples or punched multi-point metallic-coated steel brads at minimum 300 mm centres.
Full masonry – cavity wall blanket
Product: Brownie by Ecowool
Application: To the inner masonry skin.
Installation: Install horizontally to the inner masonry skin with no spacers. Overlap VMP sheet by 150 mm to cascade any water to the building cavity.
Fixing: Cut membrane at pre-installed brick ties and insert over brick tie to locate in position. Tape as required to retain against the inner masonry skin.
Full masonry – cavity walls
Product: DeSilvaLine by Pirmax
Description: DeSilvaLine PIR is a modified polyurethane (PIR-polyisocyanurate) rigid foam board with reflective pure foil facer either side of the PIR core. The product is suitable for use as thermal insulation for wall systems*.
Application: To the inner masonry skin.
Installation: Horizontally with the tongue to the top edge and firmly against the inner masonry skin. Keep boards clean and dry and free from mortar and grout. Do not bridge the cavity.
Fixing: Proprietary plastic clips on pre-installed wall ties.
Flashings: Install flashings before installing insulation panels. Prevent entry of water behind the insulation boards.
*Do not use for non-combustible wall systems
Full masonry walls – internal face
Product: DeSilvaLine by Pirmax
Description: DeSilvaLine PIR is a modified polyurethane (PIR-polyisocyanurate) rigid foam board with reflective pure foil facer either side of the PIR core. The product is suitable for use as thermal insulation below roof membrane systems.
Preparation of substrates: Conform to the following:
To the inner masonry skin.
- Remove any deposit or finish which may impair adhesion.
- Remove excessive projections and fill voids and hollows with plaster.
- Maximum surface deviation from a 2400 mm straightedge: 6 mm.
Substrate correction: Direct fix clip and top hat or furring channel to receive plasterboard finish.
Installation: Apply boards horizontally with staggered vertical joints, all close butted and without crushing.
Fixing: Proprietary adhesive compatible with the insulation. Apply sufficient pressure to evenly distribute adhesive.